 First off, I have never had a chai latte. I was looking for a morning warm drink that was not coffee. Lately, coffee has been upsetting my tummy. So on a whim at Wally World I picked up a box of Oregon Chai Original. It is gluten free. I followed the directions on the package. Boil water, mix in cup and I added a splash of cold milk to cool it enough to drink. It was lovely. Slightly spicy, lightly sweet, a lovely everyday delight. I am not sure what chai latte is soposed to taste like, but this product is super tasty and worth the $4. I give this mix 4 Stars.
Wednesday, February 10, 2010
Product Review: Oregon Chai Original
First off, I have never had a chai latte. I was looking for a morning warm drink that was not coffee. Lately, coffee has been upsetting my tummy. So on a whim at Wally World I picked up a box of Oregon Chai Original. It is gluten free. I followed the directions on the package. Boil water, mix in cup and I added a splash of cold milk to cool it enough to drink. It was lovely. Slightly spicy, lightly sweet, a lovely everyday delight. I am not sure what chai latte is soposed to taste like, but this product is super tasty and worth the $4. I give this mix 4 Stars.

Tuesday, February 2, 2010
Gluten Free Taco Bake
So recently, in an effort to solve my tummy problems, my doctor recommended that I try a gluten free diet. Today is day 3 and everything is going good. I love all-in-one pan dinner, taco bake is a popular dish in my house. I made some changes to my regular recipe to make it gluten free. The recipe is heavy on the garlic, if you don't like garlic as much as I do you can use less.

Ingredients:
1 pound ground turkey
1/2 medium onion, diced
1 medium bell pepper
1/2 cup frozen corn
4 cloves garlic, smashed/minced
4 Roma tomatoes, chopped
1 T chili powder
1/2 t cumin
1 T paprika
Red pepper flake to taste
Red pepper flake to taste
1 cup water
Salt and pepper to taste
1 packet of Bob's Red Mill Gluten Free Cornbread Mix
1 1/2 cup milk
2 eggs
1/3 cup veggie oil
Tools:
Cast iron skillet
9"x9" pyrex baking dish
muffet tin, greased
Directions
Preheat oven to 375 degrees Fahrenheit. Brown the turkey in a medium heat skillet with just a touch of oil. Mix together the dry ingredients(chili pepper, cumin, paprika, red pepper flake) and set aside. Drain grease and remove from pan, set aside. Turn the heat to low.
In the same skillet, cook onion, bell pepper and garlic till the onion and bell pepper are soft, salt and pepper to taste.

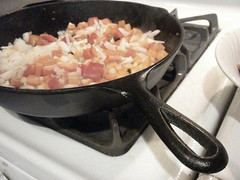
Add the turkey back to skillet. Add corn and tomatoes. Add the dry mix and the water to the skillet. Simmer untill most of the water is gone, about 10 to 15 minutes.

With a strainer spoon, move the mixture to the 9"x9" pyrex baking dish.

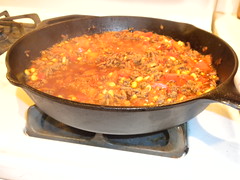
With a strainer spoon, move the mixture to the 9"x9" pyrex baking dish.
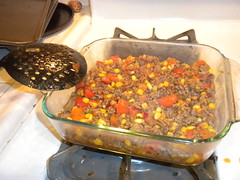
Dump the cornbread mix into a bowl (I use my kitchenaid mixer). Add milk, eggs and oil. Blend on medium until no more dry is visable. Blend on high for 30 seconds.
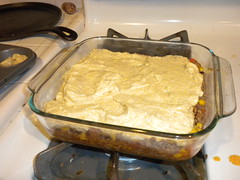
Pour about half of the bread batter on top of the meat mixture.

pour the remaining batter into prepared muffin tin 1/2 the way full. I got about 8 muffins.

Pour about half of the bread batter on top of the meat mixture.
pour the remaining batter into prepared muffin tin 1/2 the way full. I got about 8 muffins.
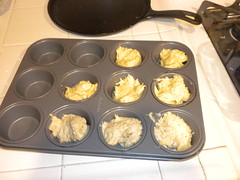
Bake on the middle rack for 20-25 minutes, until a toothpick comes out clean.
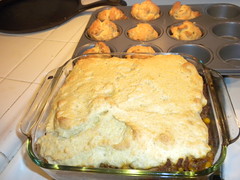
I like to serve with sour cream and shredded cheese.
For an awesome variation: add 2 cups of shredded cheddar cheese to the bread batter.


Thursday, December 3, 2009
Sideways Scarf
 Sideways Striped Scarf
In an effort to use up the last 150g of some NaturallyCaron Country yarn, I made this skinny stripe scarf for my sister.
By using different colors combined with different heights of stitches, creates varying widths of color stripes.
Items needed:
approximately 150g total of sport weight yarn in 3 colors (A, B, C)
4.00/G hook
Stitches used:
ch/chain sc/single crochet
hdc/half double crochet
dc/double crochet
Notes: Joining new colors with out a slip stitch~In order to avoid having to slip stitch the new color on to the work and having a chain to start, I join new colors as follows~ Tie a slip knot, place hook in the loop, preform indicated stitch in beginning stitch. If the row begins with a sc: insert hook into stitch, draw up loop, yarn over draw through both loops. If the row begins with hdc or dc: yarn over, insert hook in stitch, draw up loop, yarn over, draw through 2 loops(for hdc, draw through all 3 loops), yarn over, draw through remaining 2 loops.
To be honest, I didn't count the chains to start the scarf. I just chained multiples of 10 till it was long enough to wrap around my neck with about 18" on either side hanging.
To begin:
chain enough to feel comfortable
Row 1) With color A, sc in all stitches, end off
Row 2) With color B, hdc in all stitches, end off
Row 3) With color C, sc in all stitches, end off
Row 4) With color A, dc in all stitches, end off
Row 5) With color B, sc in all stitches, end off
Row 6) With color C, hdc in all stitches, end off
Row 7) With color A, sc in all stitches, end off
Row 8) With color B, dc in all stitches, end off
Row 9) With color C, sc in all stitches, end off
Row 10) With color A, hdc in all stitches, end off
Row 11) With color B, sc in all stitches, end off
Row 12) With color C, dc in all stitches, end off
repeat rows 1-12 until desired width. This stitch pattern can be used for blankets as well.
Enjoy!!

Thursday, November 26, 2009
Crochet Christmas Ornament
Lacy Crocheted Christmas Ornament
This is an idea that can be adjusted to any shape ornament.

Materials:
Size 10 Thread
1.75 mm Hook
Yarn Needle
2.63" Round Glass Ornament
Special Stitches:
dc2tog~Yarn over, insert hook into space specified, yarn over, draw up 1 loop, yarn over, draw through 2 loops on hook, yarn over, insert hook into same space, yarn over, draw up 1 loop, yarn over, draw through 2 loops, yarn over draw through remaining 2 loops.
:::For personal use only, Please:::
Here we go::
Round 1) Make sliding ring, ch2, dc in ring, ch2, (dc2tog in ring, ch2)x7, slip stitch in the top if the first dc, not the beginning chain, pull sliding ring closed
Round 2) Slip stitch into the ch2 space, ch2, dc in same ch2 space, ch2, dc2tog in same ch2 space (dc2tog, ch2 in next ch2 space)x7, slip stitch in the first dc
Round 3) Slip stitch into ch2 space, ch2 dc in same space, ch2, dc2tog in same space (ch1 dc2tog ch2 dc2tog in next ch2 space)x7 ch1, slip stitch in the first dc
Round 4) Slip stitch into ch2 space, ch2 dc in same space, ch2, dc2tog in same space (ch2 dc2tog ch2 dc2tog in next ch2 space)x7 ch2, slip stitch in the first dc
Round 5) Slip stitch into ch2 space, ch2 dc in same space, ch2, dc2tog in same space (ch3 dc2tog ch2 dc2tog in next ch2 space)x7 ch3, slip stitch in the first dc
Rounds 6-9) Slip stitch into ch2 space, ch2 dc in same space, ch2, dc2tog in same space (ch4 dc2tog ch2 dc2tog in next ch2 space)x7 ch4, slip stitch in the first dc
~At this point you would want to weave in the beginning thread tail and fit the ball into place and crochet around it. Pictured here
 Round 10) Repeat round 5
Round 11) Repeat round 3 (yes, round 3)
Round 12) Repeat round 2
Round 13) At this point it is going to be super tight, sc in each ch2 space and between each set of dc2tog(the sets that look like Vs) 16sc total.
Finish off and weave in ends.
Note: If it is possible to remove the metal top of the ball, do so before round 13. After weaving in ends replace the top, pushing the teeth of the top into the thread.
If there is any errors please drop me a note.
Good luck!!
This is an idea that can be adjusted to any shape ornament.

Materials:
Size 10 Thread
1.75 mm Hook
Yarn Needle
2.63" Round Glass Ornament
Special Stitches:
dc2tog~Yarn over, insert hook into space specified, yarn over, draw up 1 loop, yarn over, draw through 2 loops on hook, yarn over, insert hook into same space, yarn over, draw up 1 loop, yarn over, draw through 2 loops, yarn over draw through remaining 2 loops.
:::For personal use only, Please:::
Here we go::
Round 1) Make sliding ring, ch2, dc in ring, ch2, (dc2tog in ring, ch2)x7, slip stitch in the top if the first dc, not the beginning chain, pull sliding ring closed
Round 2) Slip stitch into the ch2 space, ch2, dc in same ch2 space, ch2, dc2tog in same ch2 space (dc2tog, ch2 in next ch2 space)x7, slip stitch in the first dc
Round 3) Slip stitch into ch2 space, ch2 dc in same space, ch2, dc2tog in same space (ch1 dc2tog ch2 dc2tog in next ch2 space)x7 ch1, slip stitch in the first dc
Round 4) Slip stitch into ch2 space, ch2 dc in same space, ch2, dc2tog in same space (ch2 dc2tog ch2 dc2tog in next ch2 space)x7 ch2, slip stitch in the first dc
Round 5) Slip stitch into ch2 space, ch2 dc in same space, ch2, dc2tog in same space (ch3 dc2tog ch2 dc2tog in next ch2 space)x7 ch3, slip stitch in the first dc
Rounds 6-9) Slip stitch into ch2 space, ch2 dc in same space, ch2, dc2tog in same space (ch4 dc2tog ch2 dc2tog in next ch2 space)x7 ch4, slip stitch in the first dc
~At this point you would want to weave in the beginning thread tail and fit the ball into place and crochet around it. Pictured here
 Round 10) Repeat round 5
Round 11) Repeat round 3 (yes, round 3)
Round 12) Repeat round 2
Round 13) At this point it is going to be super tight, sc in each ch2 space and between each set of dc2tog(the sets that look like Vs) 16sc total.
Finish off and weave in ends.
Note: If it is possible to remove the metal top of the ball, do so before round 13. After weaving in ends replace the top, pushing the teeth of the top into the thread.
If there is any errors please drop me a note.
Good luck!!
Subscribe to:
Posts (Atom)
